Sethubandhasana
Building the Bridge to Greater Flexibility and Strength
Shanti Arunkumar
28 Apr 2025 • 6min
Introduction
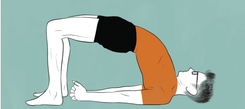
Sethubandhasana, or Bridge Pose, derives its name from Sanskrit where "Sethu" means bridge, "Bandha" means lock, and "Asana" means pose. This beautifully expressive backbend resembles an arched bridge, reflecting the mythological bridge built by Lord Rama's army to reach Lanka. Beyond its aesthetic appeal, Bridge Pose offers a gateway to profound physical and energetic benefits. As practitioners arch their bodies upward, they create a symbolic bridge between the physical and spiritual realms, opening the heart center while strengthening the posterior chain.
In today's fast-paced world where many spend hours hunched over desks and devices, Sethubandhasana serves as a powerful antidote to modern postural habits. This restorative yet invigorating pose counters the effects of prolonged sitting by expanding the chest, stretching the spine, and activating neglected posterior muscles.Whether you're a beginner or advanced practitioner, mastering this foundational backbend can transform your practice while bringing numerous health benefits to your body and mind.
Step-by-Step Procedure
Preparation
- Begin by lying flat on your back on a yoga mat with your knees bent and feet hip-width apart.
- Position your feet parallel to each other, about hip-distance apart, with heels relatively close to your sitting bones.
- Rest your arms alongside your body with palms facing down.
- Take a few deep breaths to center yourself and relax your body into the mat.
Basic Bridge Pose (Beginner Level)
- Press your feet and arms firmly into the ground to create stability.
- On an inhalation, engage your glutes and core muscles.
- Slowly lift your hips toward the ceiling, creating a straight line from your shoulders to your knees.
- Keep your thighs parallel and avoid letting your knees splay outward.
- Gently tuck your shoulders underneath your body to create more space in your chest.
- Hold the pose for 30-60 seconds while breathing deeply.
- To release, slowly roll your spine back down to the mat, vertebra by vertebra.
Advanced Bridge Pose
- From the basic bridge position, interlace your fingers beneath your pelvis.
- Press down through your upper arms and shoulders to lift your hips higher.
- If comfortable, you can walk your shoulders closer together to create more lift.
- For an additional challenge, extend one leg straight out while maintaining the height of your hips.
- Hold for 30-60 seconds before switching legs or releasing.
Full Sethubandhasana (Advanced Variation)
- From the basic bridge, place your palms beside your ears with fingers pointing toward your shoulders.
- Press firmly into your hands and feet as you lift your hips and upper body higher.
- Straighten your arms as much as comfortable, creating a deeper backbend.
- Keep your neck relaxed and avoid compressing it by maintaining space between your chin and chest.
- Hold for 15-30 seconds, gradually building up duration as you progress.
- To release, bend your elbows and slowly lower your upper back, middle back, and then lower back to the floor.
Benefits
- Strengthens the back, glutes, hamstrings, and core muscles
- Opens the chest and shoulders, improving respiratory function
- Stretches the spine, neck, and hip flexors
- Stimulates the thyroid and parathyroid glands
- Improves digestion and relieves mild backache
- Reduces anxiety, stress, and fatigue
- Enhances circulation to the brain and upper body
- Therapeutic for asthma, high blood pressure, and sinusitis when practiced appropriately
Contraindications
Sethubandhasana should be avoided or practiced with caution by individuals with:
Neck injuries or chronic neck pain
- Recent or chronic back injuries, especially in the lumbar region
- Spinal disorders such as slipped disc or spondylitis
- Untreated high or low blood pressure
- Migraine or severe headache
- Recent abdominal surgery or hernia
- Late stages of pregnancy
- Serious heart conditions
- Severe arthritis in the wrists, shoulders, or knees
Do's and Don'ts
Do's
- Always warm up with gentler poses before attempting Sethubandhasana
- Use proper breath control – inhale to prepare, exhale as you lift
- Keep your feet firmly grounded throughout the pose
- Maintain equal weight distribution between both sides of your body
- Start with the basic variation before progressing to advanced forms
- Use props like blocks under your sacrum for support if needed
- Focus on lifting through the chest rather than just pushing the hips up
- Engage your core muscles to protect your lower back
- Release the pose slowly and mindfully
Don'ts
Don't force your body into an uncomfortable position
Don't hold your breath during the pose
- Don't compress your neck by tucking your chin too close to your chest
- Don't allow your knees to splay outward or inward
- Don't rush into advanced variations without mastering the basics
- Don't place excessive weight on your head or neck
- Don't lift with just your lower back – engage glutes and hamstrings
- Don't practice immediately after a heavy meal
- Don't skip proper alignment for the sake of lifting higher
Special Considerations
For beginners, place a folded blanket under your shoulders for better support and to protect your neck. If you experience any discomfort in your lower back, try placing a block under your sacrum for a supported bridge pose that still provides many of the same benefits with less strain.
Those with neck sensitivity can keep their neck neutral rather than tucking the chin. If wrist discomfort occurs in the full variation, try placing your hands on blocks or keeping them on the floor in the basic position.
Remember that the beauty of yoga lies not in achieving the perfect pose but in the journey of discovery within your own body. Practice Sethubandhasana with awareness, patience, and consistency to unlock its full potential and build your own bridge to enhanced physical and mental wellbeing.

Related Articles